Silver Notes:
This is old version of vMA. If you want to know the new version vMA 4.1, please go to https://geeksilver.wordpress.com/2010/07/22/how-to-use-vma-4-1-installation-configuration/
Thanks
First of all, let me explain what vMA is.
vMA is Vmware vSphere Mangement Assistant tools.
It’s basically a red hat linux based VM which can help you to use command line to remote control and monitor your ESX and vcenter if you download vSphere Health Check Script. This vSphere Health Check Script is written by William Lam and it utilizes the vSphere SDK for Perl and vSphere API to extract the information that it produces. The report can be run on vMA or remote server running Windows or Linux so long as the vCLI is installed. Here’s an additional document that provides some tips/tricks when getting started with vMA –http://communities.vmware.com/docs/DOC-10878
It basically grab all information from ESX Server licenses, vCenter status, VM memory. Let me past some screen shots for you.
As Vmware Administrator, you may have lots of VM and reservations. As far as I’m concerned, I always encounter some VM got memory limitation issue and start ballooning. It slows down whole ESX host….
With help from vMA, I can schedule Email to be send to my mailbox and I don’t need to check out one by one.
Now, Let’s talk about how this vMA work.
Basically, you just need to download this vMA from vmware.com. It’s about 550MB size zip file. (vMA-4.0.0-161993.zip).
Once you download this file, you can put it under your vcenter server.
Unzip the file you will get two files. OVF and VMDK.
Turn on vCenter and select cluster node.
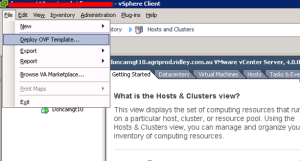
Following the picture to deploy OVF template
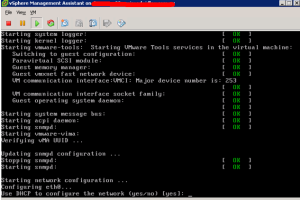
Once it deployed, you can just turn on the server. It will let you to choose to use DHCP or MANUAL IP. (You don’t need to worry about it has DHCP server, it doesn’t.).
First time vMA starts, it will let you type vi-admin password.
vMA has two users (vi-admin, vi-user). Those two users are very critical for your daily operation. Normally, you just use vi-user to operate. Please be aware that Vi-admin is not root user on this Linux server. The root user is disabled in default. It means only you have to use “sudo” command to upgrade yourself before you run some admin command.
Ok. Once you are in the vMA, there are quite few settings you need to setup.
- Setup DNS hosts file
- Download Healthcheck script from Internet to your vMA
- Setup Email server setting
- Initial servers and hosts
Setup DNS hosts file
Well, the reason we setup DNS hosts file is we want to just type server name or host name to make it work. No one wants to type 10.163.x.x all day. However, this is a red hat Linux server which may not work properly in your Windows Active directory environment, especially when your DNS is integrated with AD. Your DNS request sent from vMA won’t be acceptable by your windows DNS server.
The solution is using hosts file just like what we did on lmhosts for windows.
Steps:
Open console (or connect vMA with ssh tool , like putty) of vMA.
Login as vi-admin
The host file is located at /etc
You must use “sudo chmod a+w hosts” to make hosts file writeable.
Use “sudo vi hosts” to add your vcenter and host IP
Save and quit vi
It should look like this picture after you configure.
Download Healthcheck script from Internet to your vMA
You can directly download healthcheck script from this address.
http://communities.vmware.com/docs/DOC-9842
Once you downloaded this vmwarevSphereHealthCheck.zip, you need to unzip it and upload to your vMA. Since the account you use (vi-admin) is not root user in the vMA, so you have to upload to /home/vi-admin which is the path you can save your file.
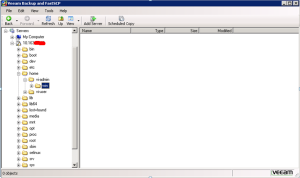
I use veeam Fastscp to connect to vMA and use vi-admin credential to login. I create a folder called win under /home/vi-admin and upload pl file. vmwarevSphereHealthCheck[1].tar.gz
Use following command to unzip tar.
tar -zxvf vmwarevSphereHealthCheck.tar.gz
Setup Email server setting
Ok. Now you have your file unzipped. Next step is to setup your Email server settings. After you unzip your file, you have created new folder and there is healthCheck.conf.
What you need to do is to modify this healthcheck.conf to use Email server settings.
Still, you use vi healthcheck.conf to modify. But you have to add this healthcheck.conf when you run your script.
The other solution is to directly modify vmwarevSphereHealthCheck.pl and search the keyword “emailserver”
Initial servers and hosts
After you change the configuration for healthcheck.conf, you may want to setup vi-user for security reason. However, vi-user has lots of limitations on accessing right. So We can skip that and directly jump to adding new target server. The target server can be host, or vCenter (vMA only supports vSphere 4.0.1 version, VI2.5 requires VIMA which we don’t discuss here).
Add server is easy part. Just following command
sudo vifp addserver <servername>
Basically, you need to log on as vi-admin to do that. You are required to type in username and password to connect to vCenter and host. You can read this details from vma pdf file. (http://www.vmware.com/support/developer/vima/vima40/doc/vma_40_guide.pdf)
There are few things I can point out here. For vCenter which is in part of domain, you should use username without domain as prefix. (e.g: just username not domain/username). For the ESX host, you can use root username to connect. Essentially, this procedure installs vi-admin and vi-user into host user list. So the command can be executed remotely.
Once you add servers, you can use command vifp listservers to check out.
Next step is to use vifpinit <targetserver> to let vMA remember credentials you use to access your servers so you don’t need to type your password everytime.
The final step is to use your script to generate reports and send this report to yourself via Email.
The full command is like this one.
/vmwarevSphereHealthCheck.pl -server VC_SERVER --username VC_USERNAME --password VC_PASSWORD --type vcenter --email yesHowever, if you have add servers into targets, you don’t need to type this long command. If you have registered your hosts or VMWARE vCenter as DNS in host file(check above), you can type DNS name instead of IP address.
As matter of fact, there is another way to authenticate vMA to vCenter and Hosts. It’s called session file. But it only last for 30 minutes not like vi-fastpass which will keep it untill you reboot your vMA. I will introduce it in my future articles.
Ok. That’s all about how to use vMA from beginning. There are much more to do with script. I will update it later in another post.
Please do leave comments if you want.
Reference:
http://www.vmware.com/support/developer/vima/
http://communities.vmware.com/docs/DOC-9842
http://communities.vmware.com/docs/DOC-10878
vma_40_guide.pdf
vsp_40_vcli.pdf
Thank William’s comment. Ta


8 Comments
Hello,
Good article and thanks for mentioning the vSphere Health Check Script that I wrote.
Few things I would add to ensure that your users don’t get confused, the vSphere Health Check is not a feature of vMA, it utilizes the vSphere SDK for Perl and vSphere API to extract the information that it produces. The report can be run on vMA or remote server running Windows or Linux so long as the vCLI is installed. Here’s an additional document that provides some tips/tricks when getting started with vMA – http://communities.vmware.com/docs/DOC-10878
I would also recommend not providing a direct download link to the vSphere Health Check Script as that goes to a specific version, any new updates will not be caught. I would just link to the VMTN document where users will be able to grab the latest version.
–William
hi, William:
Thank you for your comment. I have made my changes to my vMA. This is first vMA of whole series. I will introduce more like central logger file etc in the future. Please do come back in the future.
Thanks
-Silver
Silver,
np.
FYI – If you would like to donate to the cause – http://engineering.ucsb.edu/~duonglt/vmware/help.html
Thanks
–William
Hi
I am first time working on linux and i ve may be fairly little more knowledge than that on Vmware( bsically nwbie on both linux and vmware). I have 2 VmWare Esxi free license server. I was able to install OMSA from my windows machine but it was not able to send any alerts. I came across this script i decided first to install a linux machine. i also followed various other links from William Lam until i came across this blog which has snapshots mkes life easier for me.
MY problem is i was able to unzip by command
tar -zxvf vmwarevSphereHealthCheck.tar.gz
But now i dont understand how to set up email and generated reports
which directory do i go to
in this blog you said:::::::
Ok. Now you have your file unzipped. Next step is to setup your Email server settings. After you unzip your file, you have created new folder and there is healthCheck.conf.
What you need to do is to modify this healthcheck.conf to use Email server settings.
Still, you use vi healthcheck.conf to modify. But you have to add this healthcheck.conf when you run your script.
The other solution is to directly modify vmwarevSphereHealthCheck.pl and search the keyword “emailserver”::::::::
What does this mean? How to do that? Can u give another snapshot right after this
when i am trying to do so as per ur next snapshot:
cd vmware
i get this error
-bash: cd: vmware: NO such file or directory
I guess i am in wrong directory or i am missing something very very very basic linux thing
Sorry if this so dumb question
Alight i was able to get till
cd vmwarevSphereHealthCheck
it came to this location than as mentioned on snapshot i wrote
ls
and i cud see vmwarevSphereHealthCheck.pl as i see in snaphot so now i type
cd vi vmwarevSphereHealthCheck.pl
now i get a screen with
~
~
~
~
revSphereHealthcheck.pl” [New File]
what should i do????
i know its dumb question
any help
what is vi? some kind of editorin linux if i m not wrong?
what i need to edit????
hi, linuxNewbie:
I see your trouble. “vi” is a text editor in the linux environment. You need to google it to find out how to use this tool.
Then, you would understand the meaning.
thanks for sharing your insights. this helped me.
It’s an amazing post in favor of all the web viewers; they will take benefit from it I am sure.
2 Trackbacks/Pingbacks
[…] vMA Install, Configure and Management « GeekSilver's Blog (tags: vmware vma) […]
[…] vMA Install, Configure and Management May 2010 4 comments 4 […]