Skip navigation

Tag Archives: vMA


Vmworld is right on the corner. There ain’t much new exciting information surfacing during this waiting period. I think I can use this time to gather my energy to have a little bit dive (not very deep though) before Vmworld hit on the ground.

I’m going to talk about PSA (Pluggable Storage Architecture) as part of requirement of VCAP study list. As usual, I try to make my post as simple as I can and also very welcome to any comments.

I remember when I started to read esxcli command and concept of PSA, I was simply overwhelmed by so many different parameters and options. And just like any one, I was lost. But after I started to abstract the detail command but try to understand what these commands tell me, everything is getting clear.

Please be aware: esxcli should be only used on esx(i) ssh session. vicfg-* should be used via vMA.

PSA Concept

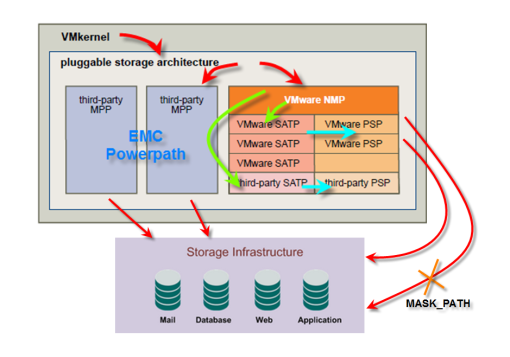
To manage storage multipathing, ESXi uses a special VMkernel layer, the Pluggable Storage Architecture(PSA). The PSA is an open, modular framework that coordinates the simultaneous operation of multiplemultipathing plug-ins (MPPs).The VMkernel multipathing plug-in that ESXi provides by default is the VMware Native Multipathing Plug-In (NMP). The NMP is an extensible module that manages sub plug-ins. There are two types of NMP sub plugins,Storage Array Type Plug-Ins (SATPs), and Path Selection Plug-Ins (PSPs). SATPs and PSPs can be built-inand provided by VMware, or can be provided by a third party.

Let’s be reasonable. If a VM send a SCSI command to access data on the SAN, VMkernel needs to know how to access and which path it should choose. That’s where whole PSA kicks in. The PSA is a framework. It contains different modules and their sub-modules.

Note: PSA has 3 layers. Mulitpathing Layers->SATP layers->PSP layers

From the above picture, we can see PSA module need to choose between VMWARE NMP(Vmware own multipathing module) and MPP (thirdparty multipathing plug-ins, like EMC Powerpath) first. If  you choose VMWARE NMP, please be aware you are not necessary using exclusive vmware product from this point. NMP still able to load third party sub-modules (SATP, PSP).

NMP&MPP layers

It basically decide which SATP to choose. This layer will see what kind of physical hardware (SAN) you have. EMC? NETAPP? DELL? It will load appropriate SATP, PSP to do other jobs. Please be aware you have bunch of SATP and PSP to choose. You can let NMP to decide or manually assign (or claim) new rules.

Please be aware MASK_PATH(MASK LUN in esx3.5) are consider as a NMP level plug-in.

SATP layer

Storage Array Type Plug-Ins (SATPs) run in conjunction with the VMware NMP and are responsible for arrayspecific

operations.

ESXi offers a SATP for every type of array that VMware supports. It also provides default SATPs that support

non-specific active-active and ALUA storage arrays, and the local SATP for direct-attached devices. Each SATP

accommodates special characteristics of a certain class of storage arrays and can perform the array-specific

operations required to detect path state and to activate an inactive path. As a result, the NMP module itself

can work with multiple storage arrays without having to be aware of the storage device specifics.

After the NMP determines which SATP to use for a specific storage device and associates the SATP with the

physical paths for that storage device, the SATP implements the tasks that include the following:

  • Monitors the health of each physical path.
  • Reports changes in the state of each physical path.
  • Performs array-specific actions necessary for storage fail-over. For example, for active-passive devices, it can activate passive paths.

Please be aware SATP can be thirdparty one. But I don’t have thirdparty loaded in this picture.

PSP layers

Path Selection Plug-Ins (PSPs) run with the VMware NMP and are responsible for choosing a physical path for I/O requests.

The VMware NMP assigns a default PSP for each logical device based on the SATP associated with the physical paths for that device. You can override the default PSP.

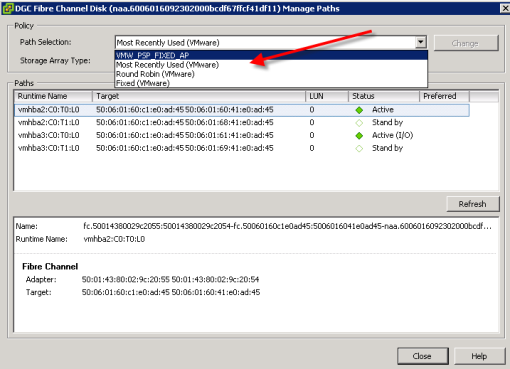
These path policy are reflected to path policy in vCenter.

I’m not going to discuss each PSP here. If you have more questions, please refer to vmware docs.

PSA command line

There are few command lines related to PSA.

esxcli, vicfg-mpath, vicfg-mpath35

so what exact does command do? What kind of information I will pull out or change?

vicfg-mpath (vicfg-mpath35 is for esx 3.5)

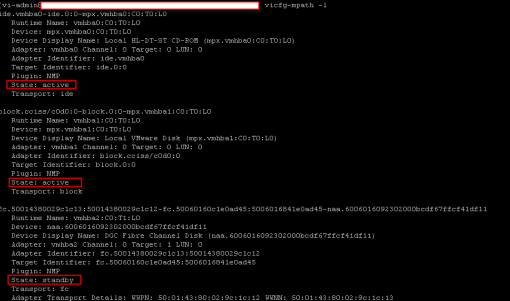
This command is to list all available path and all detailed information about your device as well.

It also has ability to disable a path and active a path.

esxcli is much powerful command comparing with vicfg-mpath.

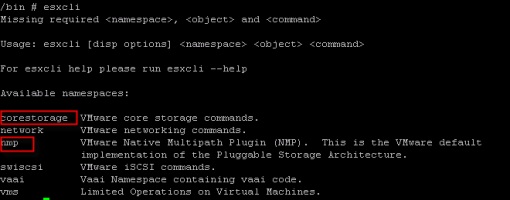
You need to be aware that esxcli is much more just to adjust PSA structure. It also control network, swiscsi, vaai, and vms behavior in vmKernel leve.

Let’s take a brief look what esxcli can do.

As you can see from the picture, from PSA wise, we only focus on corestorage and nmp.

Please consider esxcli is a command which you can use to interactive information of vmKernel pool. Let’s take look what kind of information you can access.

Configuration information (or Claim Rules)

Run command from esxi server ssh connection:

esxcli corestorage claimrule list

On the left side, we have rule class. There are 3 types of rule class(MP,FILTER,VAAI). It would appear if you use my last command. In this example, it didn’t because Hardware acceleration are not enabled and neither VAAI.

Rule runs from small to big number (or lower number as Vmware prefer). Be aware from Rule 0 to 101 are Vmware reserved rule. Between 102 to 60000 user can create their own rules. After 60000, Vmware claims those rules again.

When you build a rule, you need to build a pair rule(runtime and file). The file parameter in the class column indicates rule is defined. The runtime paramter indicates that rule has been loaded into your system.

Plugin also means  module. In this example, we have NMP(Vmware module), MASK_PATH(Vmware LUN Mask) and MPP_1(thirdparty module for NewVend).

MASK Lun method has been changed. In ESX 3.5, we use vCenter to Mask LUN you don’t want hosts to see. In ESX 4, we have to use command and create MASK_PATH rule to dedicate LUNs.

Matches column is actually conditions for rules to apply. You can clearly see what kind of conditions rule 0-4 will apply and so forth. The last rule is like last rule of ISA firwall. Every other conditions which were not defined by previous rules will fall in this rule.

Device information

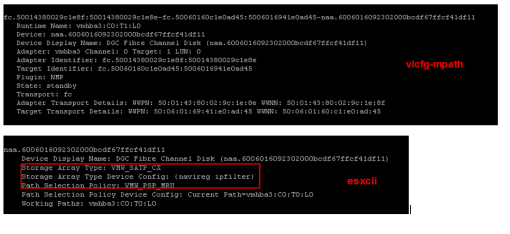
Have you ever wondering where you can see new UUID, vml, and other information for LUNs or devices connecting to your host? You can read my post at here or you got vicfg-mpath -l to do the job. You also can use esxcli nmp device list as well. But esxcli is starting from PSA wise.

SATP & PSP options

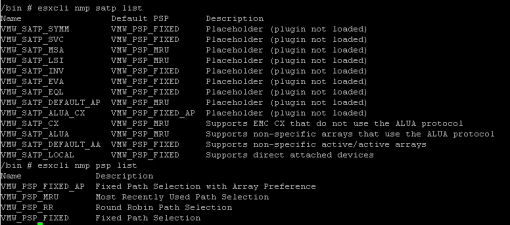
If you want to see what kind of SATP&PSP you have and you can choose, you can use

esxcli nmp satp list

esxcli nmp psp list

All right. I believe it should be easy to understand now. vmKernel has lots of information about PSA. You can use esxcli and vicfg-mpath to get information and modify as you want. I have to say, this is an understanding doc not reference doc. If you do want to add new path, MASK LUNs, or use different rules, you still need to check out all docs before you actually execute any commands.

Please do leave any comments if you want.

Reference:

ESXi configuration Guide

iSCSI SAN Configration Guide
https://geeksilver.wordpress.com/2010/08/09/vmware-vsphere-4-1-vs-esx-3-x-storage-identifier-understanding/


With new release of ESXi4.1, we all need to update vSphere components which includes HP CIM agent.

It’s very easy step if you have prepared.

Presteps:

1. We need to download hp CIM agent for ESXi 4.1 from here

2. We need vMA 4.1 or vSphere CLI available. Please refer to my last post about vMA 4.1.

3. We need to have http server ready. A simple MS windows server can do the job. You need to make sure IIS is installed.

4. Put your host into maintenance mode

Steps:

1. Downloading the 4MBs zip file from HP website. Here

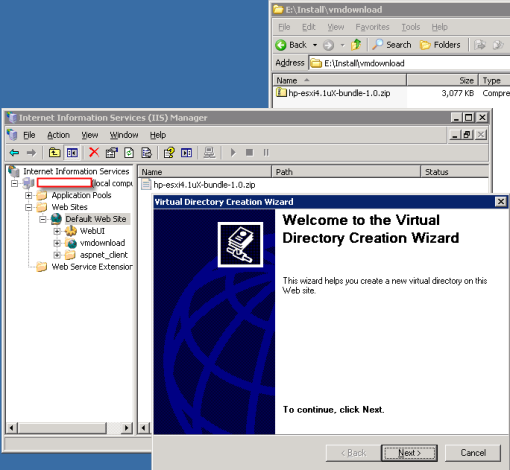
2. Setup IIS so you can download zip from your internal site.

vihostupdate supports both local zip file and http zip file. But we don’t want to upload to little poor vMA (only 5GB size). so you want to build a IIS virtual directory just let vMA able to download zip file from other local server.

After you download the zip file, you put it into one of folders where IIS is installed (in my case, it’s E:\Install\vmdownload).

Then, you need to open IIS Manager and right click Default Web site and choose “New” for Virtual Directory.

Go through the wizard as default (read only will be fine and build a virtual direcotry. (In my case, it’s vmdownload).

You can just try to download that file from any IE and to test it.

Make sure you type full address and include filename as well because you don’t have browse rights to that folder.

3. Use vMA to update hp cim to your host

You need to log in vMA and target your host first.

Then, you need to check out and see what has been installed.

vihostupdate.pl –server <server> –query

If you can’t find the bundle file, you can use these command to install

vihostupdate.pl –server <server> –install –bundle <local_path>/rollup.zip –bulletin

After installation, you are required to reboot your hosts.

After reboot, you can run command to verity the installation.

Reference:

http://h20000.www2.hp.com/bizsupport/TechSupport/SoftwareDescription.jsp?lang=en&cc=us&prodTypeId=15351&prodSeriesId=1121516&swItem=MTX-b98795300e7947d88f19ab56d6&prodNameId=3288134&swEnvOID=4091&swLang=8&taskId=135&mode=4&idx=1


If anyone can recall, I wrote a post about vMA 4.0 before. With new vSphere 4.1 released, vMA has released a new version 4.1 to work with new vSphere 4.1.

During the installation and configuring vMA 4.1, I have encounter multiple errors. I would like to thank William Lam’s help from the forum. If you want to read more about vMA 4.1 scripting, please follow William’s blog in the reference.

What’s New about vMA 4.1?

Apart from vMA is using new OS (CentOS) and it’s using vSphere CLI 4.1, SDK for Perl 4.1 and upgrade version of VMware Tools, the new version if vMA brought us a different way of authentication.  AD Authentication. Also there are some new commands to replace the old one. I’m going to elaborate as follow.

Download vMA 4.1

Downloading vMA 4.1 is pretty easy. Anyone can go to here to download OVF file and related documents. vMA 4.1 is able to load on both vCenter 4.0 and vCenter 4.1. You can get pretty good idea about how to install from vma_guide. However, there are some mistakes in the docs I would like to point out later.

Configuration vMA 4.1

When you first time run vMA, it will give  you a wizard to let you configure vMA. If you miss the chance, you can run

sudo system-config-network-tui

to reactive the wizard.

Join vMA, and ESX(i) into Active Directory

Concept

First of all, let’s talk about the concept behind this topic. Why do we need to join vMA and ESX(i) into AD?

The reason we join the ESX(i) into AD is to easy our management and try to use less username and passwords to control ESX(i). As you all know, vCenter is in the AD already. In default, Domain admin has rights to log on vCenter and manage it. However, ESX(i) use local user database and you have to use root every time in terms of logging and execute command.

I believe the second reason for ESX(i) to join the domain is to help domain users for vCLI access. Let’s image you can log on vMA(or use vSphere CLI and your script files) with your own domain accounts and execute commands against the vCenter and Hosts directly. No need to remember another set of username and passwords anymore. Everything will be integrated with same service account or domain user account.

Join ESXi to Active Domain

Connect to your vCenter which has ESXi 4.1 as host.

If you type your domain in the filed then click “Join domain” button, you must use “username” instead of “domain\username”.

I followed the smooth blog to configure it, I got following error. So you must not user domain\username format.

After you join the ESX(i) 4.1 to AD, you can connect ESX directly with vSphere Client and go to permission and add your domain account into local user database. For the rest, you can follow with smooth blog in reference.

Join vMA 4.1 into Active Directory

This is also pretty straight forward operation.

You log on vMA 4.1 with vi-admin account (vi-user hasn’t enabled yet, you have to do it manually). then, you type

sudo domainjoin-cli join your_domain your_domain_admin_user

then, you type password as what vma_guide indicated. But you may see following warning after you join the domain.

Those pam module are part of CentOS module and they are designed to not only join vMA to Windows AD, so does Linux AD. So it’s normal for you to see those warning.

You can use sudo domainjoin-cli query to verify as what I did.

Connect to vCenter and ESX(i) Hosts

There are two different ways you can authenticate your vMA to vCenter and Hosts.

Active Directory Authentication

Like what I have mentioned above, the concept for this one is to let your admin to log on with vMA with their own domain account and able to run commands against vCenter and Host without typing multiple times username and password. Comparing with fastpass authentication, vMA doesn’t store username and password into local vMA box. More secure in certain way. You don’t need to have extra passwords to memorize.

PreSteps:

Your vMA must joined the domain.

Your vCenter must joined the domain.

If you want to directly operate on Host without using “–vihost”, your ESX needs to join domain.

DNS host file must be preconfigured so vMA will know what your vCenter/host IPs are.

customize server list

Modify DNS host files

Well, the reason we setup DNS hosts file is we want to just type server name or host name to make it work. No one wants to type 10.163.x.x all day.

The solution is using hosts file just like what we did on lmhosts for windows.

Steps:

Open console (or connect vMA with ssh tool , like putty) of vMA.

Login as vi-admin

The host file is located at /etc

You must use “sudo chmod a+w hosts” to make hosts file writeable.

Use “sudo vi hosts” to add your vcenter and host IP

Save and quit vi

One thing I must point out is all server name must be FQDN and no exception!

customize server list

vMA needs to know how many servers you may connect to (although it can only operate on one server a time). vMA needs to know which servers you are going to use AD authentication and which servers you are going to use fastpass authentication. That’s why you need to build a server list.

You must log on with vi-admin to build server list.

To view current server list.

vifp listserver -l

You must use “-l” parameter in terms of to see authentication method.

If server you want is not in the list, make sure DNS host file has configured and you can use following command to add.

vifp addserver yourhost –authpolicy adauth (this is for AD authentication)

or

vifp addserver yourhost (this is for fastpass authentication)

If you try to add vCenter, you must use domain admin account because vi-admin doesn’t exist in vCenter unless you manually added in. For Host, you need to type root password and vMA will automatically add vi-admin users into Host.

Notice: There is a big trick here. If system prompt and ask you username and password, you can type “domain\username”. But if you want to use domain\username in the command line, you have to use “domain\\username”.

Now, you are ready to connect your server.

Steps:

1. Log in vMA with your domain admin account (normal domain account will work too!! But they don’t have rights to operate on vCenter).

2. target your server (vCenter or Host).

You must target one object to send command with. If you don’t do that, you will get error message like

“Error connecting to server at ‘https://localhost/sdk/webService&#8217;: Connection refused”

3. Send command to object

If you target to a vCenter and your command is a HOST base command, you must “–vihost your_host_name” to tell vCenter which Host you want. Also, the name must be FQDN!.

Notice: I was told from Vmware Support, if you use “–vihost” , then you will be asked to type username and password again!

If you target to a Host, you can just use command and it should work.

Here is the tricky thing. It should work and you shouldn’t type any credentials anymore. But some of users like me do get asked to type username and password again! Maybe it’s a bug of vMA 4.1. I’m investigating this matter with Vmware as I’m typing.

——————————————————————————————————————–

New Updates about this issue.
I just got call from Vmware Support and they admited this is a bug in the vMA 4.1. They will

fix this issue in the next release.

——————————————————————————————————————–

Fastpass authentication

This is old authentication method as previous version. Basically, the vMA stored your credentials in the local and you don’t need to type multiple times when you operate on Hosts and vCenter. The reason for that is vMA actually create vi-admin accounts into Hosts.

PreSteps:

DNS host file must be preconfigured so vMA will know what your vCenter/host IPs are.

customize server list

Please check above post to look for details about how to do it.

This is reference for fastpass authentication.

Steps:

1. Log in vMA with vi-admin.

2. target your server (vCenter or Host).

You must target one object to send command with. If you don’t do that, you will get error message like

“Error connecting to server at ‘https://localhost/sdk/webService&#8217;: Connection refused”

3. Send command to object

If you target to a vCenter and your command is a HOST base command, you must “–vihost your_host_name” to tell vCenter which Host you want. Also, the name must be FQDN!.

Reference:

http://communities.vmware.com/community/vmtn/vsphere/automationtools/vima

http://www.virtuallyghetto.com/2010/07/vma-41-active-directory-intergration.html

http://www.smoothblog.co.uk/2010/07/15/esxi-4-1-active-directory-integration/

http://www.virtuallyghetto.com/2010/07/vma-41-authentication-policy-fpauth-vs.html


The fifth part of Using ESXi to replace ESX. After Staring point, Architecture, Installation, Configuration, this is the last part of ESXi era. There are still much more I can write about after this post, like daily check script, monitoring VMs on the fly, but most of rest of stuff are similar as what you would do to ESX4. Plus, I think it’s time for me to finish this series so I can start to work on something else later on.

I hope no matter who read this post can point out what I have missed or mistakes I made. I would much appreciate it.

Every IT administrators know how important Log files are. Without log files, we will loss our senses and don’t know what’s going on in the black box. ESX4 has quite complex logs which I will reveal briefly in this post. ESXi logs are easier than ESX but lack of documentation always troubles me. I will try my best to explain what I know about ESXi logs.

How many logs are there and where you can find them?

One thing I dislike about Vmware is they intend to put logs everywhere instead of have one central locations to store all logs (log server can do that, I will talk about it later). There are few tools we can use to collect logs but let’s check out what those logs are.

Logs for vCenter Server:

vpxd log: vpxd log is vpx daemon (or service) logs. It’s archived when it reaches 5MB or vpxd.exe service is restarted. In default, maximum 10 vpxd log files are maintained. The eight oldest log files are compressed.

vpxd-profiler log: this log file is to gather performance-related information.

location: C:\Documents and Settings\All Users\Application Data\VMware\VMware VirtualCenter\Logs

All other windows installed components logs can be found at similar path as showing above.

Logs for ESX & ESXi Host:

main host log files:

/var/log/messages                              -Operating a system log (ESX/ESXi, 4 weeks)

/var/log/vmware/hostd.log           -Host agent log(ESX/ESXi, max 10 files)

/var/log/vmware/vpx/vpxa.log  -vCenter Agent log (ESX/ESXi, max 10 files)

/var/log/vmkernel                             -VMkernel log (ESX only, 36months rotate)

/var/log/vmkwarning                       -VMkernel warnings (ESX only, 4 weeks)

How to change Log level and log file locations?

Changing log level is important. Like what I have mentioned before, Vmware support can’t find much information from normal log level which is verbose. In terms of getting all details you want, you may want to setup your log level to “trivia”.

With ESXi, you have to go into different folder and modify different configuration file to switch the level and change your log file location. You don’t want to your log files stuff up your in-memory file system. Like all settings you want to change, you need to backup the original file first.

messages log

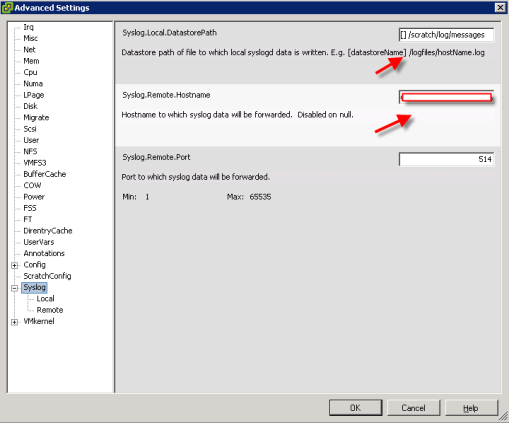
Messages log can be changed from vCenter console as what you can see from my last post.

or you can modify /etc/syslog.conf to make change.

hostd log

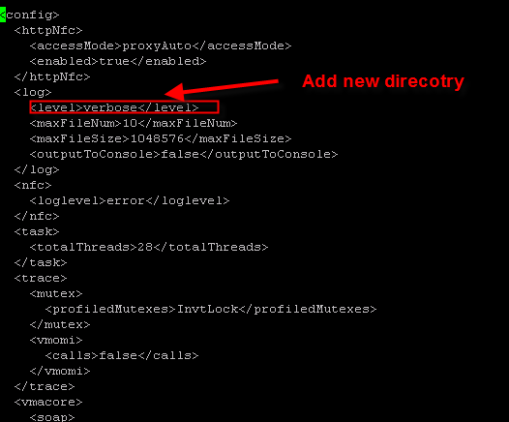
Configuration file: /etc/vmware/hostd/config.xml

Original file looks like this:

After modification:

vpxa log files

vpxa is agent which talks to vCenter vpxd. If your HOST is showing disconnected from vCenter, this is a must check place.

Configuration file: /etc/opt/vmware/vpxa/vpxa.cfg

vpxa.cfg has verbose keyword but it lacks of location for where log files need to be stored. We can just manually add directory into it.

You have to modify log level and manually add directory in.

After  you have done all those things, restart hostd daemon.

services.sh restart hostd

then, you can check out your local storage and see any files have created by system.

Forward your logs to central log server

We can forward logs to a central log server. This central log server can be vMA sitting on Linux, but I wouldn’t suggest since the size of vMA ovf is only 5GB altogether. Imaging if you have 20 HOSTs and each host (regardless ESX or ESXi) is using trivia log level. How much 5GB disk can hold up?

Plus, do you want log files sitting on vm or a physical box when issue happens?

Therefore, my recommendation is using dedicated syslog application and installed on your vCenter. vCenter should be a physical box and collect all logs. Plus, you should have logs sitting on your local host VMFS as well just in case vCenter is not available.

Setup syslog server on your vCenter

So you can either download free log server software like Kiwi log server from solarwind.

http://www.solarwinds.com/products/freetools/kiwi_syslog_server/

The only problem of using free version of kiwi log is you can’t rotate file and have to keep watching it in case it comes oversize and stuff you disk. Also, log files are sent via UDP(port  514) in realtime, it doesn’t actually sort different logs into different files. Hence, you will get one big file instead.

Setup ESXi Server to forward logs to syslog server

It’s very easy for esxi to setup for forwarding Logs to central syslog server. Just put server FQDN to syslog.remote.hostname.

Collecting and reviewing logs

There are different ways to collect logs and export logs.

You can use vm-support -w <path> to sets working directory used for output files. This is critical for ESXi since ESXi doesn’t have much space in in-memory file system.

You can use vCenter->File->Export System Logs, or view logs from vclient

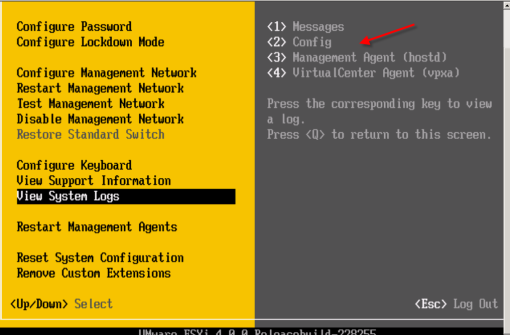
You can use DCUI to view logs

oh, Well. I guess this is the end of my series of Using ESXi to replace ESX. One of my friends just told me that his VMWARE rep told him ESX will be rolled out of market and replaced by esxi in 2011. I’m glad I have made this series to help myself and everyone about ESXi. Please leave your message and comments. I will reply them once I got time. Thank you for reading.

-Silver


First of all, let me express my personal feeling to people actually visit my site day by day. I have been away for one week to get MCITP:EA certificate and haven’t updated my blog for one week. But I’m just surprised by how many people actually keen to come back my blog.

Now, I’m off MS for a while and finally can dive into VMware world again and hopefully, I can get practical and deep as well. With no further duo, please allow me to bring up this new series topic, Using ESXi to replace ESX.

Why would you to use ESXi to replace ESX in the production?

I’m pretty sure that’s the first question you would ask. That’s also first question my manager asked as well. In the old time, ESXi is a free product and not even get supported by Vmware. And what’s wrong with ESX?

Well, if we double check what vmware said recently.

§First choice is ESXi Embedded, whenever possible.

ESXi is the future.

VMware has announced its intention to eventually replace ESX with ESXi.

§Design the management infrastructure to support VMware® ESXi, even if deploying VMware ESX™.

Limit the use of service console–based command-line management and monitoring agents

Develop ESXi management techniques now because ESX will eventually be phased out.

This message is from a vSphere Design workshop and blogged in vFrank.

As far as I understand, Vmware had enough headache to fixing RedHat version of Service Console. More than 50% percentage of Updates are delivered for SC.Thousands Support call are related to this poor Management console and Vmware believes ESXi can work better, lighter, and easier. According to my personal experiences, I’m very troubled by ESX console ping dropping. I have 2 or 3 software monitoring SC via ping, SNMP and there are always issues.

Concerns about ESXi

It’s free product, do I get support?

Yes, you do. I just have Vmware License team shoot an official Email to me to prove ESXi is supported as long as you have full production support. You will get exactly same support as esxi.

Does ESXi support vMotion, HA, FT, DRS, blah,blah?

Yes, they are. ESXi support all those functions with no issues.  I would like to provide you a link which is comparison of ESX and ESXi. http://kb.vmware.com/selfservice/microsites/search.do?language=en_US&cmd=displayKC&externalId=1015000
So what kind of features does ESXi support?

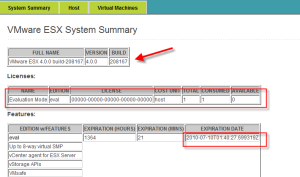
I can show you a picture with most functions of ESX and ESXi supported. If you want to get full list, please follow this link. http://www.vmware.com/products/esxi/facts.html This page shows there are no functions ESX supports while ESXi doesn’t.

To be continued…….

Reference:

http://www.vfrank.org/2010/04/13/esx-will-be-phased-out-esxi-is-the-future/

http://kb.vmware.com/selfservice/microsites/search.do?language=en_US&cmd=displayKC&externalId=1015000

http://www.vmware.com/products/esxi/facts.html


Silver Notes:

This is old version of vMA. If you want to know the new version vMA 4.1, please go to https://geeksilver.wordpress.com/2010/07/22/how-to-use-vma-4-1-installation-configuration/

Thanks

First of all, let me explain what vMA is.

vMA is Vmware vSphere Mangement Assistant tools.

It’s basically a red hat linux based VM which can help you to use command line to remote control and monitor your ESX and vcenter if you download vSphere Health Check Script. This vSphere Health Check Script is written by William Lam and it utilizes the vSphere SDK for Perl and vSphere API to extract the information that it produces. The report can be run on vMA or remote server running Windows or Linux so long as the vCLI is installed. Here’s an additional document that provides some tips/tricks when getting started with vMA –http://communities.vmware.com/docs/DOC-10878

It basically grab all information from ESX Server licenses, vCenter status, VM memory. Let me past some screen shots for you.

As Vmware Administrator, you may have lots of VM and reservations. As far as I’m concerned, I always encounter some VM got memory limitation issue and start ballooning. It slows down whole ESX host….

With help from vMA, I can schedule Email to be send to my mailbox and I don’t need to check out one by one.

Now, Let’s talk about how this vMA work.

Basically, you just need to download this vMA from vmware.com. It’s about 550MB size zip file. (vMA-4.0.0-161993.zip).

Once you download this file, you can put it under your vcenter server.

Unzip the file you will get two files. OVF and VMDK.

Turn on vCenter and select cluster node.

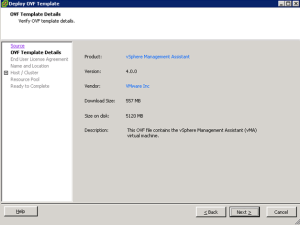
Following the picture to deploy OVF template

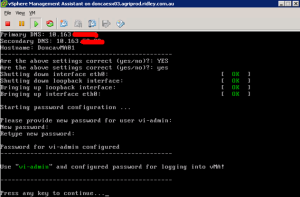
Once it deployed, you can just turn on the server. It will let you to choose to use DHCP or MANUAL IP. (You don’t need to worry about it has DHCP server, it doesn’t.).

First time vMA starts, it will let you type vi-admin password.

vMA has two users (vi-admin, vi-user). Those two users are very critical for your daily operation. Normally, you just use vi-user to operate. Please be aware that Vi-admin is not root user on this Linux server. The root user is disabled in default. It means only you have to use “sudo” command to upgrade yourself before you run some admin command.

Ok. Once you are in the vMA, there are quite few settings you need to setup.

  1. Setup DNS hosts file
  2. Download Healthcheck script from Internet to  your vMA
  3. Setup Email server setting
  4. Initial servers and hosts

Setup DNS hosts file

Well, the reason we setup DNS hosts file is we want to just type server name or host name to make it work. No one wants to type 10.163.x.x all day. However, this is a red hat Linux server which may not work properly in your Windows Active directory environment, especially when your DNS is integrated with AD. Your DNS request sent from vMA won’t be acceptable by your windows DNS server.

The solution is using hosts file just like what we did on lmhosts for windows.

Steps:

Open console (or connect vMA with ssh tool , like putty) of vMA.

Login as vi-admin

The host file is located at /etc

You must use “sudo chmod a+w hosts” to make hosts file writeable.

Use “sudo vi hosts” to add your vcenter and host IP

Save and quit vi

It should look like this picture after you configure.

Download Healthcheck script from Internet to  your vMA

You can directly download healthcheck script from this address.

http://communities.vmware.com/docs/DOC-9842

Once you downloaded this vmwarevSphereHealthCheck.zip, you need to unzip it and upload to your vMA. Since the account you use (vi-admin) is not root user in the vMA, so you have to upload to /home/vi-admin which is the path you can save your file.

I use veeam Fastscp to connect to vMA and use vi-admin credential to login. I create a folder called win under /home/vi-admin and upload pl file. vmwarevSphereHealthCheck[1].tar.gz

Use following command to unzip tar.

tar -zxvf vmwarevSphereHealthCheck.tar.gz

Setup Email server setting

Ok.  Now you have your file unzipped. Next step is to setup your Email server settings. After you unzip your file, you have created new folder and there is healthCheck.conf.

What you need to do is to modify this healthcheck.conf to use Email server settings.

Still, you use vi healthcheck.conf to modify. But you have to add this healthcheck.conf when you run your script.

The other solution is to directly modify vmwarevSphereHealthCheck.pl and search the keyword “emailserver”

Initial servers and hosts

After you change the configuration for healthcheck.conf, you may want to setup vi-user for security reason. However, vi-user has lots of limitations on accessing right. So We can skip that and directly jump to adding new target server. The target server can be host, or vCenter (vMA only supports vSphere 4.0.1 version, VI2.5 requires VIMA which we don’t discuss here).

Add server is easy part. Just following command

sudo vifp addserver <servername>

Basically, you need to log on as vi-admin to do that. You are required to type in username and password to connect to vCenter and host. You can read this details from vma pdf file. (http://www.vmware.com/support/developer/vima/vima40/doc/vma_40_guide.pdf)

There are few things I can point out here. For vCenter which is in part of domain, you should use username without domain as prefix. (e.g: just username not domain/username). For the ESX host, you can use root username to connect. Essentially, this procedure installs vi-admin and vi-user into host user list. So the command can be executed remotely.

Once you add servers, you can use command vifp listservers to check out.

Next step is to use vifpinit <targetserver> to let vMA remember credentials you use to access your servers so you don’t need to type your password everytime.

The final step is to use your script to generate reports and send this report to yourself via Email.

The full command is like this one.

/vmwarevSphereHealthCheck.pl -server VC_SERVER --username VC_USERNAME --password VC_PASSWORD --type vcenter --email yes

However, if you have add servers into targets, you don’t need to type this long command. If you have registered your hosts or VMWARE vCenter as DNS in host file(check above), you can type DNS name instead of IP address.

As matter of fact, there is another way to authenticate vMA to vCenter and Hosts. It’s called session file. But it only last for 30 minutes not like vi-fastpass which will keep it untill you reboot your vMA. I will introduce it in my future articles.

Ok. That’s all about how to use vMA from beginning. There are much more to do with script. I will update it later in another post.

Please do leave comments if you want.

Reference:

http://www.vmware.com/support/developer/vima/

http://communities.vmware.com/docs/DOC-9842

http://communities.vmware.com/docs/DOC-10878

vma_40_guide.pdf

vsp_40_vcli.pdf

Thank William’s comment. Ta